
Ask me a question, I’ll probably give you more of an answer than you’d expect.
What got you into doing the type of art quilts that you make?
*wry grin* That goes back a few years. Bear with me while I take a trip down memory lane.
Once upon a time… No, wait… Once there was… No, that’s not exactly true, either. *laughs at self*
I used to watch a quilting program on TV. The hostess was demonstrating how to use cross-stitch patterns as a basis for a quilt top. Each stitched square represented a square on the quilt. It was a simple matter of matching the colored square to the square on the grid that was being made. Half stitches became half square triangles, and so forth. I wasn’t quite sure how the back-stitching would be done, as quilting doesn’t usually make that thick of a line. The show did what it was supposed to — an idea took root.
If I could make cross-stitch patterns into quilts, and cross-stitch patterns were pictures turned into stitches, how could I get a photograph into a cross-stitch pattern to turn it into a quilt? At this point in my designing, I was well versed with graph papers and crayons/colored pencils. Being an administrative assistant, at the time, I was getting acquainted with photo editing software. Somewhere, some how there had to be a way to make the two worlds meet. I needed to figure out how.
I’d begun playing around with the different types of filters in the photo editing software I had access to. I discovered I could do some crazy and silly stuff with just a few clicks of a mouse. I used to marvel at what would have taken me hours – if not days – to sketch out the changes I wanted/needed to make to an image. Given that my sketching looks like an elementary school art piece, that I could have an almost ready-to-use design in a matter of minutes was incredible.
The next obvious, to me, step was to put my ideas into action. Working with grids was almost too easy. If you can follow a colored chart, you can do this. When I finished my first piece, I was pretty excited about how the photo had pixelated out. I wasn’t quite as pleased with how the defining details were lost. Grid work was fantastic for basic designs, but not so fantastic for detail work.
If I’d have stayed with this particular style of work, I’m fairly certain I’d have found a way around the problems I was having. Given enough time, most design issues will find their solution. I wasn’t willing to stay with it long enough to work it all out. *holds up hand* Before you start taking shots at me for setting this style aside, understand that I was already moving on with “There HAS to be a better way”. I’m not saying grid work is bad or not worth experimenting with. I’m saying that it wasn’t right for me at that particular time in my life.
I wanted something more. I knew I was on to something. It would take me a while to figure out what.
Fast forward a few months. An artist friend of mine had emailed me some incredible photos he’d taken. It took some convincing, and a whole lot of promises, before he’d allow me to use his photo as a basis for a quilt. There were a few tough stipulations I needed to adhere to. I may not have agreed with the stipulations; I had agreed to them.
And so work began on this new ‘style’ of quilting. I’d ran the photo through several different photo editing filters, trying to find one that would – I thought – work best with translating into fabric. The place where I was working had several meeting rooms that had projectors. I was given the clearance to use company equipment on my free time (usually before work). I put my edited image on a jump drive, grabbed a roll of drafting paper, some tape, and a couple of pencils and set off to spend an hour or so tracing my design out.
I still hadn’t quite figured out the mechanics for changing a digital image into fabric, but I knew I was going to find a way. I had a goal.
I had a lot of fun collecting the fabrics for this quilt. Since the photo editing software allowed me to change a few colors around and add colored highlights/low lights, it was a matter of trying to match those up. Quilt shop owners thought I was a bit nuts, but humored me. My friends were curious to see what I’d come up with. As for me? I wanted to see what I’d come up with.
At the end of the weekend, I’d learned some very important stuff:
- Don’t use heavy fusible webbing
- It makes the fabric very stiff
- It’s difficult to sew through
- It gums up the sewing machine needle
- Turn the design/pattern backwards
- You’re fusing to the wrong side of the fabric, so the design needs to be backwards when you trace it out onto the paper side of the fusible webbing
- The design/pattern has a definite left and right side; try not to mix them up
- Fussy cutting can be your friend
- Designs/patterns on the fabric can be used as detail elements
- Checking the for better pattern piece placement may get better results
- Sharp scissors are your friend
This is what I’d managed to accomplish over a regular weekend:

Over the course of the next month or so, I’d cleaned the design up. It took that long, because I was still hemming and hawing about what I was going to do with the finished piece. I still hadn’t quite figured out how I wanted it quilted, or if I was even going to keep it.
Prior to quilting:
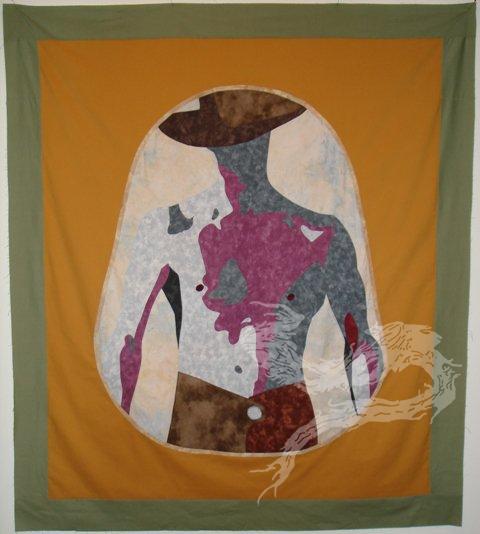
I have had the piece quilted. The professional long arm quilter I took it to had a lot of fun working with metallic threads to give it a little extra “oomph”. I’ve started the binding, but haven’t finished it out. Why? Because I’d mis-sewn the mitered corner and cut the fabric. Normally, this wouldn’t be such a big deal. However, the fabric I was using for the binding is faux-leather. I may, one day, take that fabric off and replace it with something else. Until then, this “Dream Lover” quilt will wait.
Recent Comments